Heritage Days 2016

It’s been awhile since I’ve posted anything, but I’ve been hard at work on different projects, especially ones leading up to this event.  Historic Mansker’s Station near Nashville, TN, is the site where I first started reenacting and it’s always held a special place in my heart.  Every year in early April they have a historical event focusing on historical trades, which I have attended for the last 3 years representing 18th century mantuamaking.

FB_IMG_1461202083257_wm

FB_IMG_1461202104227_wm

I had several examples of late 18th century style handsewn gowns and accessories on display.  Many of the attendees of this event (especially on the first day, which is primarily for school groups) are young children, and it was really fun to engage them in age- appropriate discussion about the intricacies of 18th century fashion.  There were several adults who stayed in our tent for quite some time, and we had very enjoyable and hopefully informative conversations about lots of commonly misunderstood things about historical fashion.

Also, for the first time ever, I got to do an 18th century hair demonstration on my very patient friend Rachel.  I used Heirloom Haircare’s pomade and powder, and various techniques I learned from the amazing book 18th Century Hair and Wig Styling by Kendra Van Cleave.

FB_IMG_1461202092848_wm

FB_IMG_1461202089000_wm

FB_IMG_1461202098983_wm

I kept my historical hairdressing tools out, and used them to explain 18th century hair care to visitors who didn’t get to see the hair demonstration.  It was a really fun event (especially the second day when it wasn’t so cold), and I am looking forward to next year’s where I am planning on a dress-in-a-day demonstration.

Rebecca

(All photos in this post were provided by my sister Hannah who wore an jacket I made for her that is based on Claire’s jackets from Outlander.  I will do a post on that soon!)

Red Sacque Gown

This gown has been about 4 years in the making, and I am so glad it’s finally done!

I started it so long ago that I’m not sure where exactly all the construction pictures I took of it went.  It is fairly straightforward sacque construction, with a fitted back lining which the gown back drapes over, and a stomacher front, making it suitable for the 1760’s-1770’s or so.  I borrowed Katherine from the Fashionable Past’s idea to hide lacing under the robings to secure the gown a bit better than pinning it.  I had planned to wear the gown for an early December event last year, but I realized last minute that there was no way it would work.  I had gained about 40-50 pounds since I made the pattern for this dress four years ago and several others that no longer fit as well. In this “before” picture, you can see the problems I had. (Also I apologize for the *horrible* bathroom selfie format of these pictures! I try to get better pictures of the finished product but in-process is harder to do.)
image

So the first fix I did was to make new stays, which helped the situation immensely.  I am going to post about these soon, but am currently wearing them unfinished because I wanted to move on to making some gowns.
image
image
(…I did warn you! Maybe I will remember to clean the counter off next time!)
Then I began making the sacque more wearable.  I added robings on either side of the bodice, covering up the lacing holes and making the stomacher opening narrower, as it had been much too wide before adding them.  Then I started adding trim.  I did 4-inch wide self-fabric strips on the stomacher arranged in a bow shape, and on either side of the skirt opening I did 6-inch wide poufs. I thought about padding out the trim, but they held up all right without padding for now. I sewed all the poufs on from the outside using a spaced backstitch, which felt like it took forever, but it took only about 6-8 hours, sped up by Netflix watching and audiobooks.
image

image

Here is the finished gown!
image
I wish I always had huge historical fireplaces as the backdrop for my photos 🙂
image
I was worried when I first started this gown that the back pleats had too little fabric and weren’t full enough, but it worked out! I should wear more skirt supports for sure, maybe I can make some small panniers before the next wearing.
image
These are the hard to see poufs on the skirt fronts. I may outline them with a darker red trim someday so they stand out more.
image
I’m really proud of my stomacher trim! This was the first time I have ever worn a stomacher fronted gown, and it worked out perfectly! I forgot my lacing string for the hidden lacing, so I ended up pinning the robings to the stomacher (which I didn’t intend on doing) and it held up very well, with no wardrobe malfunctions at all!

Some final thoughts: The gown turned out beautifully and wore very well. With that said, I would highly recommend not using upholstery weight cotton to make a sacque or any nicer gown with, as the material is very hard to see with if multiple layers are involved. Additionally, heavy cotton is not the most accurate choice for a fine gown, which current me knows a lot better than younger me who spent 14 dollars a yard on this fabric in 2011. *sigh* Live and learn, I guess. But that’s not going to stop me from wearing this gown to all fancier occasions where I may need some of the pluses of cotton like washability, breathability, etc. I’m just glad I was able to finally get this gown done and wear it!

I’ll leave you with some more pictures of the event where I wore the gown and my hairstyle.
image
My husband and mother-in-law. She wore a gown I made in about 2012 or so, a silk petticoat I remodeled from a skirt from Goodwill, and a Larkin and Smith cap with ribbon to match.
image
I wore my hair in a high pouf with the aid of some rats I made from my own hair (rats being pads made from hair, kind of like a historical bump-it). I am going to buy some pomade and powder and experiment with real 18th century hair styling soon, so stay tuned for that!
image
For some reason, one strand kept wanting to fall over, so I had to keep running to the bathroom and fixing it.
image
I wore another Larkin & Smith cap, and I love how it turned my simple pouf into an elegant hairstyle! I will also do a review of these caps soon!

Thanks for reading!
Rebecca

Historical Sew Monthly September Challenge: Brown

This is my first HSF/M challenge ever!  Even though it’s not September anymore, this garment was completed in September, and I wanted to practice the HSF format.  This shirt was sewn as a commission for the man I sew for, who works full-time at a museum.

image

This is the first of about 6 or more shirts I am sewing for him, as he wears 18th century more or less full time.  The shirt features machine sewing on all major inside seams, but all finishing (flat felling, hemming, buttonholes, etc.) are all handsewn.

image

I added rectangular shoulder reinforcements, and triangular gussets at both the hip and neckline, which help make the shirt fit better and wear more durably.  I know that if my handsewing can stand the wear that this shirt will get, I should never have a problem with any of my clothes, as they have to endure considerably less wear.

image

The sleeves are very full and considerably long, almost folding over near the wrist.  I may need to change that in future shirts, as they run the risk of getting caught and tearing or generally impeding movement.

image

I wanted to try out marking the shirt with cross stitch, as it would help differentiate the shirts I make from the other ones he owns.  I sketched out my own gridded pattern for this, and put a “1” to signify which shirt this is.  Since in future shirts I will vary some elements for a better fit, numbering them makes it easier to tell them apart.

Here’s the quick and dirty info:

The Challenge: Brown

Fabric: Lightweight Unbleached Linen

Pattern: my own pattern, drafted from measurements

Year: approximately 1750-1820

Notions: linen thread, 5 bone buttons

How historically accurate is it? 80%, more or less.  The machine stitching would have been handstitched in the 18th century, but aside from that, as far as anyone can see, it is historically accurate.  I’m practicing stroked gathers for the next one, so it should be even better!

Hours to complete: A lot, I didn’t keep track.  I would estimate at least 40 hours, but probably more.

First worn: Worn for photos upon delivery and to ensure fit.  I think he has worn it to a reenactment since then.

Total cost: Since it was a commission and he provided the fabric, I don’t know.  This linen runs about 10 dollars a yard, so probably about $20 for fabric alone exclusive of labor.

Remembering WWII 2015

Last year I heard about a somewhat local event in Linden, Tennessee called Remembering WWII.  With such fantastic posts from Atlanta at Story of a Seamstress and Lily at Mode de Lis, I knew that we had to go in 2015.

So we got a small group together who all wanted to dress in 1940’s clothes, and made plans to go.  Between everyone going, it wasn’t hard to outfit everyone in vintage or vintage-inspired clothing from head to toe.

I got my hair cut in a middy style especially for this occasion, because it has not been shorter than shoulder length since I was a sophomore in high school.  I practiced wet sets for awhile beforehand to get the hair just right.

image

This is the results of the first hairstyle I tried.  Success!

image

image

I took these two pictures the morning of the event to show my sister and her friends whose hair I also did, so they wouldn’t freak out at the mass of curls that happens when you start taking all the curlers out!  You can see the curler that was a dud right in the front there.  I pinned that side behind my ear, which worked well to hide it.

We got to Linden just as they started the first reenactment. It was sprinkling rain for most of the time we were there, which caused everyone’s hair and hats to droop a bit, but it all worked out in the end!

image

My husband and I standing in front of one of the many vintage cars that were parked along the street.

image

My sister and I. She is wearing a dress I made a few years ago, and my dress was made for this event from fabric I had bought years ago to make a 40’s dress. You can see my shoes in this picture, they are vintage style shoes I got from eBay.  They are pretty comfortable, but I may bring other shoes to change into next year, there is a lot of walking involved in this event if you want to see everything.

image

These are my sister and two of her friends, and they looked adorable all day long!  They got a lot of attention from other attendees.  I am still trying to track down some of the pictures that were taken of us all by different people there.
Somehow I managed not to get any photos of my other friends that went, but they looked great as well!

It was a really fun day!  I did not manage to take any pictures of the other goings on, but we got to see two veterans telling their stories about the war, a reenactment, some swing dancing, and some musical performances that were all really enjoyable.  My favorite part was just walking around the town.  The people who live there had done so much work to give the town the proper ambiance of a WWII era small town.  There were lots of other reenactors dressed to the nines, even whole families all in their Sunday best!  I think this is definitely an event we will be attending again, and hopefully with a larger group next time!

Rebecca

How to Make a Hoopskirt on a Budget

In my previous post, I said I would write a tutorial on how to heat-straighten various types of plastic materials for use in costuming.  When I decided to use plastic tubing to make a covered hoop, I had a problem:
image

The tubing I bought would not straighten out enough to put in the channels!  So I did some research, and found out that others had this problem when they used the tubing for plumbing or aquariums.  I saw various recommendations, but settled on one I could do: heating the tubing and then shaping it how I wanted.  So without further ado, here’s how I made my covered hoop.

1. Draft your hoop pattern (skip if you are using a commercial pattern)
For this part, I used two great tutorials written by Chrissy at The Laced Angel here and here.  Once your pattern is decided, you can purchase your materials.  I used two rolls of tubing and 3-4 yards of cotton muslin.

2. Sew the fabric part of your covered hoop
I decided to have my tubing placed in tucks on the inside of the hoop, so that the bones of the hoop would not show through my petticoats.  Since I planned a 5-bone hoop, I sewed 5 tucks into my fabric skirt portion. I made sure to leave an opening (in my case, center front) to use later to put in the hoops.

image
image

image

I then pleated and pinned the waist of the soon-to-be hoopskirt onto my dressform to await the tubing.

3. Prepare the tubing
I measured and cut the tubing into the lengths I had planned out for each level, and got ready to heat them.  First I heated a large pot of water to boiling.
image

Then I took each hoop one by one and briefly submerged it in the boiling water.  I removed it (with tongs and potholders!) and arranged it as shown on towels I laid in the floor.  To keep the shape I wanted, I tucked each end into a cardboard tube I made slightly larger than the plastic tubing.
image

(Disregard the extra piece, it is leftover from the end of the roll.) To keep the hoops flat while they cooled, I set some books on them.
image

(Of course I had to protect my costuming books with towels!) Finally, I left them overnight to dry.

4. Insert hoops into channels

Now that the hoops were ready and cooled, I put them in the channels one by one, starting with the bottom.
image
To close off the hoop, I took a small piece of tubing and cut it in half down the middle (so it made a little halfpipe sort of shape). I then boiled it using the same process I did for the other tubes, and while it was still hot, bent it in half and wedged it into each end of the circles to make the join sturdy. If I fastened them with duct tape or something similar, it would always leave a weak point, and overlapping the hoops would not work well because they are round and would add extra bulk. The method I used has worked fantastically so far. It should be mentioned that you have to join the hoops after they are put into the channels.

If you are making a hoop like Chrissy’s in the tutorial I linked above, each hoop is inserted and closed in the same way. I wanted my hoop to have a mid-1860’s style with a flatter front and more back thrust, so I made the top two hoops go 3/4 of the way around, leaving the front open, and sewed them in place by poking a hole in the tubing with a large tapestry needle and securing it with several stitches. (For some reason I didn’t take pictures of this step, or of the finished hoop by itself. I will get detail pictures of it and add those in later.

5. Finish the waistband
Chrissy’s hoop has a drawstring waistband, which is definitely a valid option, but I decided to practice my gauging technique and sew my hoopskirt and petticoat waistband at the same time.
image

The gathers are whipped onto the waistband, which closes in front with a button.
image

image

In this photo, you can see how the hoop has a noticeable back thrust and flat front. Considering that this is a make-do hoopskirt for a time period that I very rarely get to go to events for, I think that this attempt was a success!

I will very soon be using the heat-straightening technique on some trimmer line to use in a new set of stays, as mentioned in my last post. I will be sure to take lots of pictures so that anyone interested in using this technique will be able to figure out how, and it will get its own post eventually.

Can you think of anything else this tubing might be useful for in the costuming world? Comment below and share your ideas!

Rebecca

Hardware Store Costuming

Hardware stores are a treasure trove of DIY supplies, especially if you can think outside the box on how you use things.  I have personally used a variety of hardware store materials for my costuming projects because I am on a budget, and also because I used to work at a hardware store where I saw things all the time that sparked my imagination about their different costuming uses.  So I thought I’d make a list of some things I have successfully used in my own costuming projects.  This post will primarily focus on materials, and I intend to explore all the different good and bad things about each material, and some of the workarounds that are possible to avoid common pitfalls of budget costuming. For a similar post about tools that can be used for sewing, check out Hallie Larkin’s blog post here.

(Note: Most of these are not historically accurate, but all of them can be used as alternative options if the most historically accurate options are not available or too expensive.)

879686003663

Most historical costumers have heard of or jumped on the bandwagon of the “cable-ties-as-boning” trend.  They can be bought in packages or coils, and in 1/4 inch or 1/2 inch widths.

Pros: They are relatively inexpensive, and easy to cut and shape compared to other boning types.  The 1/4 inch widths are very good at approximating period widths of baleen, and the 1/2 inch widths can be used for pocket hoop panniers, lobster tail bustles, etc.

Cons: They (especially the 1/4 inch) come in fixed lengths, often too short for long-waisted stays or diagonal boning channels.  The narrower widths work best when doubled in the channels, otherwise they are usually too weak to hold up to average figures.  The wider widths do not approximate the look of any (18th century) period boning materials well, and often truncate or turn in any channel they are placed in, causing wear on the fabric and unsightly lines on the outside of one’s clothing.  (I would only recommend them for possibly the back lacing area on stays or boning for 19th century corsets in a pinch, as steel boning often works much better for this application).  The coils of 1/2 inch boning do not work well for most applications because they have a tendency to curl up and ruin the lines of anything they are put in.  This can be remedied by heat-straightening them (which will be talked about later, and get its own tutorial blog post!).

What I have made from them: 1/4 inch- 2 pairs of 18th century stays and one set of Regency stays.  1/2 inch- an 1860’s corset.

019736999038

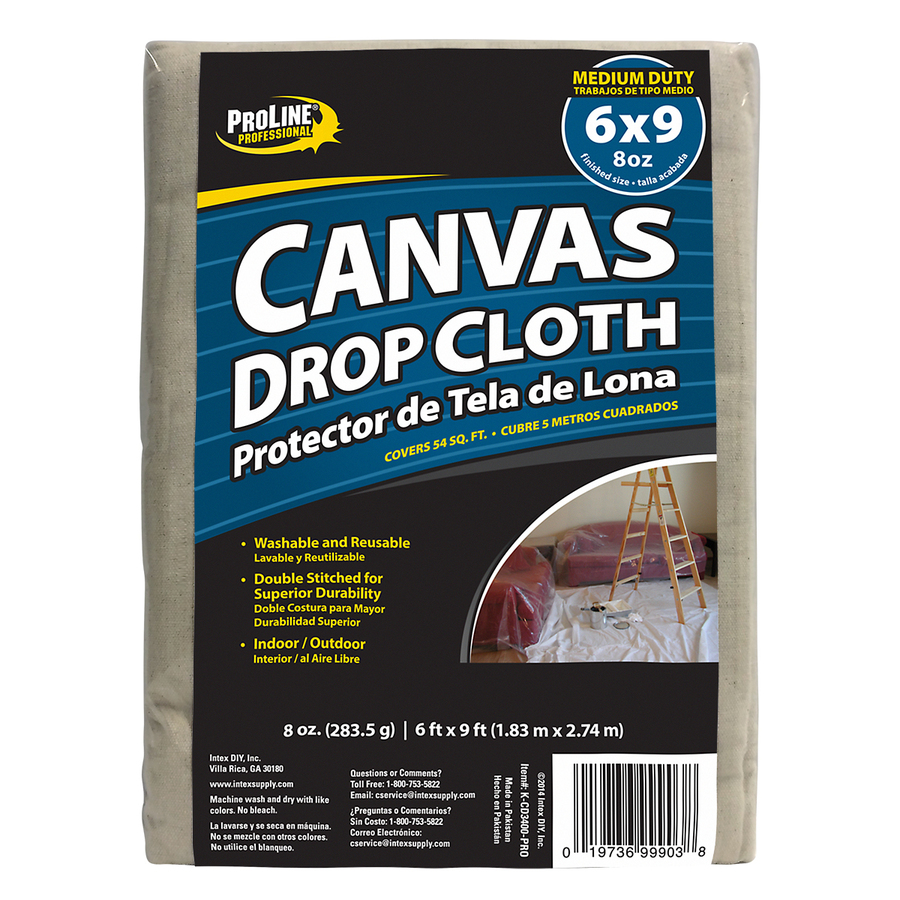
Drop cloths have become popular in the home DIY community as alternative materials for slipcovers, curtains, and similar projects.  I decided to try them as the hidden strength layer in my latest stays, as it is very similar to canvas from a fabric store.

Pros:  Very sturdy and non-stretchy material.  Worked really well in the way I used them, and could also be used for boned skirt supports like panniers.  They can also be bought in many different sizes, so you can buy the amount you need (smallest size is around 6′ x 9′, or 6 yards for $11).

Cons:  Cut edges fray, but that is normal for canvas.  Some different brands have a small amount of artificial fibers.  Finally, they smell really bad when washing for the first time, but it is necessary to prewash them because they have lots of sizing and other things that you don’t want next to your body.

What I have made with them: Two pairs of 18th century stays

015221165162

I have heard one mention on a now-defunct site of possibly using trimmer line as an alternative boning material.  This stuck with me for years and, in my most recent pair of stays, I decided to give them a try.

Pros: The width and dimensions of the trimmer line more accurately approximate reed or baleen boning.  Depending on which brand and size you go with, (I recommend the pictured Ugly Line 0.095 for half-boned stays) the line can provide plenty of support and stiffness for most figures, especially larger ones.  It is also easy to cut and tip, like cable ties.  Truncating is not a problem like it is with cable ties, as line is round or triangular and just shifts position slightly, making it perfect for curved channels.

Cons: The width I used may be too much for fully-boned stays or slimmer figures, but you could always get a smaller line for those uses.  Trimmer line only comes in coils, as far as I know, but heat-straightening should work for them too.  The line I used comes in bright yellow, which may be an issue when not using a strength layer or thin top fabric, as the color may show through.  Finally, since the trimmer line is round and not flat, it may add slightly to your measurements when wearing stays made with them.

What I have made with them:  One pair of 18th century stays.

071798061016

Chamois is one of several different kinds of leathers used as binding on 18th century stays.  It is often available in automotive sections where it is sold for use as a buffing cloth for waxing cars.

Pros: The leather is very soft and easy to work with, and can easily be handsewn.  The fuzzy texture of the leather makes any accidental pinholes disappear, which is an advantage over other kinds of leathers.  It can easily be cut with normal scissors to any width you need, for both binding and seam welting.

Cons:  The leather often comes in a maximum size of approximately 14” x 16” or so, so binding has to be seamed or pieced.  Because it is a thinner type of leather, it may tear under high stress, but most applications should be fine.

What I have made from it:  Binding for two 18th century stays, and about to use as lining for a pair of mitts.

859897003034

Plastic/Vinyl tubing is not a very common material outside of the plumbing world, but its sturdy nature makes it suited for a variety of skirt support undergarments.  Inspired by Leimomi’s tutorial here, I made an 1860’s style hoopskirt out of it, encased in fabric so the tubing is not seen.

Pros:  It is very strong and resists bending, which makes it work well for holding up the weight of multiple petticoats.  It can work for many different kinds of skirt supports, from large panniers to hoops to bustles (as long as the curves are not so sharp that they kink the tube and make weak points).

Cons: It does not look the least it period correct (as it of course is not), so if anyone might ever see your finished skirt supports, it is best to make a covered hoop.  Also, it only comes in coils.  The tubing REALLY resists any method of straightening it out, and I have only found one that safely works.  You have to straighten it out by dipping it quickly in a pot of boiling water, and shaping it in its desired shape.  Fear not, I saved plenty of pictures from the process when I made my hoopskirt, and I will write a tutorial post about how to do this very soon!

Have you ever used any hardware store materials in your sewing projects?  Do you have any experience or tips about using the materials mentioned in this post?  Please leave a comment below!  I’d love to hear about what you did!

Rebecca

Bonnet 2.0

After finishing my first bonnet and making some mistakes on it, I decided to make another that fit better. I had an epiphany while on vacation that instead of messing around with patterns, I could use something I knew already fit me: a sun hat.
My grandma gave me an old hat to salvage the brim, and I slightly enlarged a standard cap pattern I have to form the top part/bag.
image
The finished bonnet! I decorated it with self-fabric poufs. Since it is smaller, it works better for the 1770’s and working class 1780’s personas.
image
This is what the bonnet looks like over a cap. In my opinion, bonnets like this look better with caps that have more fullness around the ear or neck, such as round-eared or lappet caps. This cap does not represent my current skill level and is sewn with inaccurate techniques, so I will be making more caps to replace it soon.
image
This is what the area where the bag and brim join looks like before trimming. It is pleated with most of the fullness in the front. Unlike my first go around, I left the bonnet bag unlined, which gave me the desired result.
image
This picture makes it look like a baseball cap, but you can see just how much smaller I ended up making the top. You can also see how it is necessary to end the pleats before about the ear or so, or else the drawstring will pull them over in a weird way.

I have worn this bonnet probably 4 or 5 times since I made it. The black silk does retain heat, but it is breathable. I am really pleased with how it looks, and the solid brim stands up to a bit of manhandling without giving up its shape.

Have you made a bonnet recently? What did you learn from the experience? Comment below and let me know!

Rebecca

18th Century Market Bonnet Pattern Review

Maggie from Serendipitous Stitchery’s 18th Century Market Bonnet Pattern has been making the rounds lately (you can buy it here), and I thought I’d share how my version turned out.

To start out, the pattern is very well put together, with lots of information and good instructions!  It helped soooo much, because bonnet making was pretty much a mystery to me before this.

image

Here is how the bonnet turned out!  It’s so big!! There were a few ways that my version differed from Maggie’s instructions (I learned my lesson there!! Stick to her instructions!)

image

First of all, I lined the cap portion of the bonnet, which I hoped would make it a bit cooler, and if any sweat happened to get in the bonnet, it wouldn’t ruin the silk.  However, this weighed down the silk, which now wants to collapse towards the back of my head (I kind of think it looks like an octopus sitting up there!).  Leaving the silk unlined in my second bonnet helped with this a lot.  (I was jealous of the nice volume everybody else was getting in their bonnets!)

image

The second way I deviated from the instructions was to use a double layer of buckram for the brim, instead of chipboard, like she recommends.  Even though I wired it, the buckram doesn’t have enough stiffness and wants to straighten out, which makes the brim flatten out and look odd.  Using chipboard is definitely preferable, because it is thicker and can be shaped like you want it.

I don’t think I will be wearing this bonnet much, as I made another one where I corrected the problems I had.  But it is a great pattern, and many other costumers have made great versions of it.  Hopefully you can learn from my mistakes!

Have you made a bonnet from this pattern?  Comment or share a picture below, and let me know how it went for you!

Rebecca